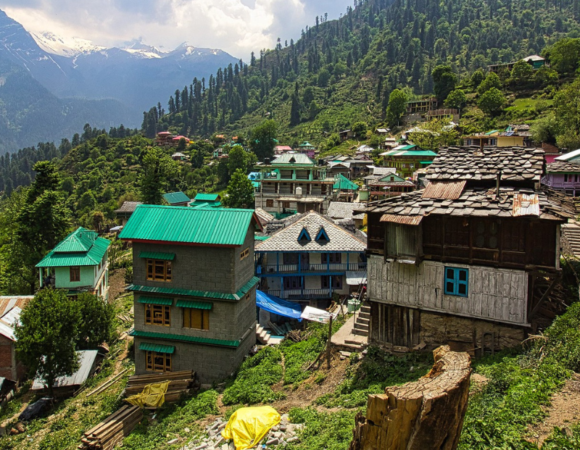
The Himalayas offer some of the most incredible scenery anywhere in the world, so it’s no surprise that travel photographers from all over the world flock here in droves with cameras in hand. Reaching some of the region’s most scenic spots requires a trek, so if you’re planning a visit, it’s best to be prepared for some strenuous physical activity.

You’ll need to come equipped: a tent, a large water bottle, some cold weather clothes and, of course, a reliable camera, are all essentials when visiting the Himalayas. However, you also don’t want to bring too much.
You’ll constantly be on the move, so efficiency is the name of the game when preparing your gear. In this piece, we’ll cover how to pack light for a trekking and photography trip to the Himalayas.
1. Use Online Photo Editing Tools
As a travel photographer, you’ll be doing plenty of Photoshop work on the go. If you’re doing this offline, you typically need to bring a laptop powerful enough to run the entire Creative Cloud app suite. If you don’t want to be lugging a massive computer around with you as you trek the Himalayas, online photo editing is a great alternative. You can create stunning photo effects on Photoshop online that will take your already beautiful pictures of the Himalayas to another level.
By using online editing, you’ll eliminate the need to bring a large, powerful laptop with you wherever you go. Taking a smaller computer with you allows you to travel with added convenience and frees up space for other essentials. If you want to travel even lighter, you can even forgo the laptop entirely and use Photoshop’s mobile app to edit your pictures.
Photo editing is an essential part of being a travel photographer. Often, you can’t wait until you’re back home before doing your editing work: you might have deadlines to meet, or you might want to keep your social media/blog followers updated in real-time. Take advantage of the different online photo editing tools at your disposal to quickly and easily make tweaks to your footage without the need for large, heavy devices.
2. Bring Reusable Food Containers
Trekking is physically demanding. It’s vital to stay full and hydrated at all times to avoid fatigue and more serious health issues, particularly when you’re out in the wild. We recommend taking reusable food containers with you, especially if you’re about to embark on a longer trek. Having a full water bottle and extra stores of food also lets you spend a longer time outdoors, giving you a chance to snap pictures of more remote areas.
Bringing reusable food containers means you only need to bring a single water bottle and lunchbox, which is crucial if you’re looking to travel light. They’re also super light when there is no food stored in them, and won’t weigh you down. Don’t forget to bring reusable cutlery, too. Foregoing single-use items not only allows you to do more with less but also helps combat pollution and protect the local environment.
3. Create a Comprehensive Travel Itinerary
Efficiency is crucial in travel photography, especially if you’re visiting a region as vast as the Himalayas. Creating a comprehensive travel itinerary not only allows you to maximise the number of sites you can visit but also makes it easier to pack no more than what you need. Itineraries can be as detailed or flexible as you like. However, you might want to consider creating a separate detailed itinerary for each different hike. You can even include maps and key notes, and then download the itinerary – this would allow you to access it wherever you go, without needing an internet connection.
For an overall itinerary, start by deciding how long you want to stay in the Himalayas. Then, pack a sufficient number of clothes to see you through the trip. Pack one or two extra changes of clothes at most in case of an emergency. Also, re-use what you can to cut down on baggage: if you are mostly trekking, a single pair of trekking shoes should be enough for your outdoor needs. Jackets can also be re-worn from day to day, so bring two or three, depending on how long you intend to stay. While it’s always nice to bring an entire wardrobe with you so that you have options to choose from, practicality needs to be the priority when travelling to the Himalayas for trekking and photography.
4. Choose Your Backpack Wisely
When you imagine trekking the Himalayas, you likely picture hiking steep mountainsides with a backpack. There’s a good reason for this: a backpack is a necessity if you want to spend any amount of time in the wilds. It allows you to store items like food, water, an extra change of clothes and, of course, your trusty camera.
However, not all backpacks are created equal. It’s important to choose a backpack that’s been designed specifically for photographers like you. Some features to look out for include a tripod holder, expandable storage that fits your camera and a clamshell opening that gives you easy access to your gear. Given the demanding nature of trekking the Himalayas, you should also look for a bag that offers insulation against the cold and extra padding to keep more sensitive equipment safe. A good backpack can make for a trusty companion in the harshest environments, so choose wisely.
Last But, Not The Least: Packing Up
Every year, visitors from every corner of the globe come to the Himalayas to take in their natural beauty and embark on scenic treks. If you’re a travel photographer, you absolutely need to pay a visit to this region at least once in your life.
When packing your bags, you should always try to do more with less. A trip to the Himalayas requires plenty of physical exertion, so the lighter your bags are, the better. Make use of the packing tips we’ve provided in this article to make your Himalayas journey a success.
Frequently Asked Questions for How to Pack Light for a Himalayan Trekking and Photography Trip
Why is it important to pack light for a Himalayan trek?
Carrying less weight reduces strain on your body, helps you trek longer with less fatigue, and ensures better mobility on rugged terrains. In high altitudes, every gram counts.
How do I balance photography gear and trekking essentials?
Stick to minimal, high-quality gear. Carry one versatile camera body, 1–2 multipurpose lenses, a compact tripod, and essential accessories. For trekking, prioritize lightweight layers, hydration, and energy food.
What are the must-have photography items for a Himalayan trek?
Follow the layering principle. Pack:
– 1–2 moisture-wicking base layers
– 1–2 trekking pants
– 1 warm fleece
– 1 down or padded jacket
– 1 rain/windproof outer layer
– 2–3 pairs of socks
– 2 pairs of underwear
– Avoid cotton, go for quick-dry, lightweight materials.
Should I carry a laptop or drone for photography?
Only if absolutely necessary. A drone adds bulk and may be restricted in certain areas. Laptops are heavy—use a portable SSD to back up images from your camera instead.
What kind of backpack is best for this trip?
Use a 40–50L trekking backpack with good support and weather protection. Use packing cubes and dry bags to organize and protect gear.
How do I keep my camera gear safe during rain or snow?
Use waterproof camera bags or dry sacks. Pack silica gel packets to prevent moisture damage. Also, always keep gear in padded inserts inside your backpack.
Is there a weight limit for what I should carry?
Yes, ideally keep your backpack under 10–12 kg total, including water, food, and camera gear. If porters are available, carry only your daypack essentials.
How do I pack light food and snacks for the trek?
Pack calorie-dense, lightweight snacks like trail mix, granola bars, dried fruits, and ORS sachets. Avoid bulky or canned items.
Any tips to reduce weight without missing essentials?
– Use travel-size toiletries
– Repack items into ziplock bags
– Choose multi-use gear (e.g., buff as scarf, headband, or mask)
– Share gear like medical kits or tripods with a partner
– Digitally store documents (ID, permits)